
Pipe Kit Info
Pipe Making Kit Information
Future Pipe Makers:
Pipe kits are designed to alleviate the need to have a large shop full of tools . All that's left for you to do is carve. The kit contains a briar block that has the tobacco chamber, the air hole and the tenon holes drilled and meeting at their proper locations. As you are making a custom pipe, many decisions have to be made before we drill the block. They are:
- Straight or Bent - how much bend ,full(oom paul) half, or quarter
- How big a bowl.-small, medium or large
- Style of stem - Military (freehand style) or flush fit (regular) taper or saddle
- Shape of the pipe- give me a general idea what you hope to make.
- Flush fit or Military stem
- Lucite or Vulcanite stem material
	These considerations do not effect the cost of the kit and
 are design options that you can choose to make or not.
The following effect the price of the kit:
- Type and size of the briar blocks-ebauchon or plateaux (rough top)
- Composition of stem- Acrylic or Vulcanite
Ebauchon blocks are used in the manufacture of machine made pipes. They are generally cut perpendicular to the axis of the straight grain rendering them cross grains with birdseye. They tend to have more inherent flaws than plateaux briar. They are good for a small to medium pipe. This would be my recommendation for a first pipe.
Plateaux Briar, as the name suggests, is the top part of the burl. It has a rough pebble top that can be left on for a freehand look or sanded smooth for a traditional appearance. Plateaux comes in different shapes and sizes. we will do the best we can to match your design to the proper block. Plateaux grain tends to run straight or angled. These blocks will generally yield flame grains or an occasional straight grain. They contain generally less flaws than ebauchon , though you don't know what a block will yield until you get into it.
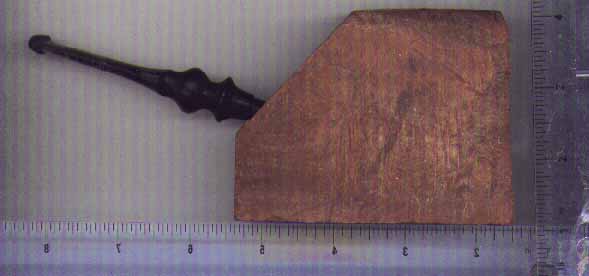
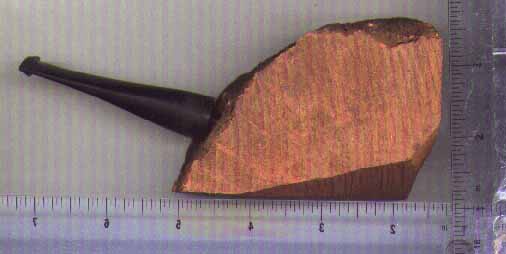
PICTURES OF THE KITS:
Pictures displayed are all bents but they are the same size blocks that would be used for straights in the same category. Also size of kit is irregardless of stem choice.Please note that briar varies quiite a bit,block to block, especially in plateaux, so these are examples only. The ebauchon sizes do not vary as much.
Plateaux kits follow these guidelines.
PK5,6,7&8 consist of blocks that weigh between six and eight ounces.
PK9,10,11,&12 consist of blocks that weigh between eight and ten ounces.
PK 3-4 -7-8-11-12 come with lucite stems, all other come with Vulcanite
PK2 or 4
PK6 or 8 (with flush fit stem)
PK 10 or 12

American Smoking Pipe Co
PO BOX 13
Wolf Creek, MT 59648
mt@mt.net
Information on making kits
An article by Walt DeVisser:
Constructing Your First Pipe
As I Have Experienced It
Constructing a pipe can be both a fulfilling, rewarding experience and a disappointing project depending on what you wish to do with the finished pipe. Almost any home constructed pipe can be smoked with great delight. We just hope the finished product meets our preconceived ideas of a successful project.
Tools Of The Trade
Let us first discuss the equipment required in the shop or workroom. One of the most important machines for making pipes is the Dremel (or equivalent) rotary tool and a small collection of tools and fittings. You can use the Dremel, or as I shall call it, "rotary tool" as it comes from the factory or you can add the flexible shaft attachment for a little extra cost and do away with the problem of holding the tool itself. I have my rotary tool suspended above my workbench and use the flexible shaft attachment. It is smaller, fits my hand better, and allows better control of the tool bits or sanding spools. The bits, sanding spools, and buffing components will be the most used with the sanding spools being the most important. The medium or fine grits in the 5/16 and 1/2 inch spool size fits the bill for most applications. The next tool you will most likely need, at least to do it my way, is the 1 inch wide belt sander with a small 6 inch disc sander on one end. I have a Dremel but there are others that will do the same thing. Mine has a 30 inch belt that is easy to change and the belts are cheap. I get them from the flea market for about a dollar apiece but they are available at most hardware stores and even Wal-Mart. The price of belts goes up to about four dollars or so if purchased there. Either way, you can get a lot of life from a belt. Use a little coarser grit of perhaps 150 or even 100. The fine grit works well but does have a shorter life than the coarser grits. I use this to remove large amounts of wood fast and to do the rough out of the pipe. I use the disc sander to square up sides and sometimes to remove stock fast also. I have a shop vacuum I hook to a manifold system of PVC pipe that allows me to connect the sander to the vacuum to remove a good portion of the dust that is all over the shop but that I don't want to kick up in my face. A drill press is really required for the drilling of the smoke hole and the tobacco hole. I also use it to square the shank end and to drill the mortise. In fact I also use it to finish the tenon end of the stem. A nice tool to have with the drill press is a drill press vise. I have made many pipes without one butt hey do make it a bit easier to hold the stummel when drilling the holes. You can in fact make the tenon without the drill press but the result is either very careful work with sandpaper or a poorly fitted tenon. I have done both and the result with the drill press is by far the better way to go. If you do not have a drill press a jig for drilling can be constructed as shown in the STEMCO-PIMO book although I have not attempted it that way. If you have a metal working engine lathe, you may not require a drill press, but it is a pretty expensive way to go if you do not know for sure you will like the hobby. When purchasing a drill press for pipes, assuming you don't have one just waiting to be used, be sure the stroke of the quill is at least several inches long. I purchased a small drill press that won't allow me to use regular length bits and still get the stroke I require on normal stummels. The table is too close to the chuck and using the base is all right except it is too far away and requires a spacer. So think about it before purchasing a new drill press. You will need only a few bits. I use a 3/16 for the smoke hole and a 3/4 spade bit that I modified for the tobacco hole. I was a tool maker in another life. You can also purchase from STEMCO-PIMO, a tobacco hole kit of three sizes. Not a bad idea if you are not at least an amateur tool maker. Additionally, their tenon tool and mortise tool are perfect. The cost of the tenon turning tool is a bit high at around sixty dollars but it really is a time and frustration saver. The mortise tool is also nearly a must have. It drills the mortise and squares the shank so the stem fits square. I made several pipes without this timesaver and always found there was a visual crack between the stem and the shank. No matter how hard I attempted to make it square, it always seemed to be off. Only after I purchased the mortise tool did I have perfect fits. It is well worth the money.
Now For The Saws
If you have a well supplied wood shop you will likely have all the saws you need. For a long time I made do with a decent scroll saw and you can too. I since have acquired a three wheel band saw which works much better. If you have a scroll saw available, it will work fine. Make sure you have rather coarse teeth in your blade as you will have to be cutting through a couple of inches of briar and that is a big enough job without trying to do the job with a fine toothed blade. You can do without the saw all together if you don't mind a lot of extra sanding dust. On the other hand, you could use a hand saw, a dovetail saw, a coping saw and even a table saw. The band saw is by far the best choice. If you have one you are all set, if you don't, try one of the others but do be careful. Missing fingers make it hard to hold the pipe bowl for sanding in the future. Another tool that costs little but is very much required is a buffing setup. There are grinders on the market that can be fitted with buffing wheels and there are double ended buffers that are driven by a belt that also work well. I use a liberated motor with a simple shaft adapter mounted on the shaft. This adapter is 1/2 inch and has screw threads the length of it. I put a buffing wheel on and tighten the nut. Works well for me because it has no framework surrounding it to interfere with my buffing or tripoling operation. You need at least one stitched buff of muslin to use when working with tripoli brown and perhaps others if you decide to use other tripoli compounds. You also need a wider but unstitched buff of flannel for applying wax. These come with a 20 ply or so width and you apply wax and do the finishing with it. It is nice to have a last buff that you use only to do a finish buff with. I don't use one but it does make a little better gloss on your prized project. All these buffs are available at STEMCO-PIMO for about four or five dollars each. Tripoli and wax are also available at the same source. The tripoli brown and the carnauba wax are available in 2 oz. sizes for the wax at about three and a half dollars and the compound in 1 1/2 oz for two dollars. If you have a couple of motors you can make a setup for each type of buff. One motor will do the job very well though. Use a motor speed or 1750 rpm or so. I do have a contour sander also but it has not proven to be very helpful. It does help in the final shaping but sanding by hand does a good job also. I purchased the contour sander because of trouble in my elbow. The trouble with it is that it vibrates and that is just as bad. I do use it as a bit of help in finishing the roughing process as it will round with little effort. Not required but something for the future. Other supplies you may require are sandpaper, stains, cloths, brushes, and a few other things. Sandpaper I use is whatever is available. I purchase a good share at the flea market but a couple packs from the hardware store will do just fine. I use 150 grit for rough in work and final shaping. I use 220grit to start my finish and work out any scratches from the 150. I use a 400 as my last grit unless I have some 600 which I may use if the job is super. I don't think much work is done with the 600 but it makes me feel better. I often finish with a bit of artificial steel wool of 0000 grade. The stuff is plastic but does make a nice finish before staining. Alcohol stains are available from STEMCO-PIMO and I have all the offered colors. The brown mahogany is really quite red and the cherry is really brown. The colors depend on how much you apply. I went to my local drug store and got some of those brown bottles that medicine comes in for a few cents apiece. They are alcohol resistant and you only need about 2 oz of alcohol per mix. I use finishing alcohol which is denatured and cheap. It is also used for fuel in marine stoves. I also keep a bottle of rubbing alcohol on the bench to check grain in a briar block and I use it to wipe down my work on the stummel from time to time as well as my hands before beginning work on the last sanding operations. Either that or you must wear gloves to keep the oil on your hands from contacting the briar. Just a bit of this oil and you may leave a bald spot in your staining. I keep a few rags around to use when wiping down my project. I also stain using rags although others use brushes. I don't mind a stained finger for a day and even that can be eliminated by using a little of the rubbing alcohol right after staining. About all that is left is a radio to keep you company or some other source of your favorite music and a few drawing tools. I use a circle template and a French curve set to help draw the pipe and I also use a draftsman's compass to help transfer lines. A small square is a big help in squaring up the briar block before starting operations. I would suggest you purchase a mask or other breathing protection device. I use the throw away ones and hate using them. I do use them when ever roughing on the sander and during the initial shaping with the rotary tool. I must confess I do away with them as soon as the worst is over. I think that about covers the shop requirements and of course you can do without most of them if you have a lot of time and don't mind many hours of carving. Bring your coffee, tea or brandy and, of course, your pipe. It's a nice hobby and you should have no trouble crafting a suitable pipe of which you can be proud.
Briar
Briar is available from several sources. STEMCO-PIMO offers briar in their catalog and you can get very nice briar from Mark Tinsky also. It is available as ebauchons in different sizes and as plateaux. The ebauchons offered by STEMCO-PIMO are suitable if you don't purchase the smaller sizes. Some of the sizes offered are too small by far. Stick with the middle and larger sizes. The plateaux is fine but remember that the shapes are weird. All of the plateaux available comes in shapes and sizes too weird to describe. The grain is nicer and the blocks larger but you do pay a price for the good stuff. I now get my briar from Mark Tinsky. I get a hold of him and ask him to select some nice blocks of about 6 oz size. The larger ones do offer a choice of how you arrange your pipe on the block and if you get a real big size of about 10 to 12 ounce size you may be able to get two pipes from the same block. It rarely works out that way and my recommendation is to order 6 ounce blocks. There is less waste of your hard earned money that way. There are always flaws of some sort in any of the briar you buy and there is no way to tell if you have a fatal flaw in yours. All you can do is pray and hope it won't show up at the last minute. Mark also has very fine ebauchons in large sizes. I have made fine pipes from that grade and can recommend that also. Plateaux runs about a dollar and seventy-five cents an ounce. Ebauchons about three to five dollars per block. I have put a few blocks on my workbench and just looked at them for a couple of hours trying to figure just where to put a desired shape. Sometimes I just put them all back and try with something else. The last time I ordered briar, I just asked for $200 worth of plateaux in the 6 oz size. The next time I order briar I will ask for 4 or 5 pieces of plateaux in 6 oz size and the rest in ebauchons of good size. I give away too many pipes as it is and have been selling only enough to keep me in supplies. If I am going to give them away, I can do more with less money invested. I now try to make only sellable pipes and if they won't make the grade, then I may give one to a friend or I may rusticate and sell them at lower prices. One of the advantages of having a smoke shop to market through.
Stems
A word about stems. You can get stems from several sources including STEMCO-PIMO. The cheapest ones are cast. I suggest you try your first pipe with one of these. Later you may want to make your own from rod. They are not very expensive and I suggest you get at least a few of those shapes you like best. They come in a bunch of sizes so be sure of what you order. I find that 1/2 and 5/8 inch sizes fit most pipes. Of course if you can afford it, get a few of as many as you think you will likely use. Sometimes you make an error and have to scrap a stem. At least they don't cost too much. Wait until you have made a couple of pipes before getting into the more exotic versions. There may be chips or bad mold spots on a couple of the stems you purchase. You can normally work these out and use them. If you like the freehand type, get a couple of them too. In the case of these, you won't have to make the nice joint between the stem and shank. Don't let that prevent you from getting the others though because the job is not that difficult.
Layout
The first thing you have to do is decide what you want to make and then lay it out on the block selected to be the first victim. Before you get to that part you may wish to sketch and draw and sketch again until you have a good idea of what you wish to make. I would suggest a straight pipe for the first one. The angles are easier to drill and your chance of success is much greater. If you have purchased a pre-drilled kit from Mark Tinsky or another source, you may make anything you desire. Still, a straight pipe is easier. I assume you are working from scratch so after deciding the size and shape, you can either draw it on a manila folder and cut it out with a blade or draw it on your block of briar. To make the whole operation easier, first take the block and attempt to get it square all around. This may not be possible so at least make the facing surface and the bowl end square. This is because you will be locating your drilling from these surfaces. Now, having squared your briar as best you can, take a bit of rag and your rubbing alcohol and wet the surface of the block to enhance the grain. This makes it easier to find the best place to draw your pipe. Take advantage of the grain if you can and the block is of good grain quality. You may not have much choice and your pipe will turn out just as well anyway. Now with circle template, French curve, freehand and anyway you can draw the pipe on the block. If you have drawn it on manila cardboard, you can just trace it. During the process of drawing place a line down the center of the tobacco bowl and down the center of the shank. Draw the line well through both ends. Where these two lines intersect will be the bottom center of the bowl. If you have a spade bit that you intend to use, use it to draw the bottom of the bowl also so you can see where the air hole will come through the side of the bowl. Depending on the shape of the bit, you may have to adjust the depth of the bowl or change the line down the shank to make you happy. Remember the air hole drill has width and you must take that into consideration when determining the hole penetration into the bowl. If you are using a 3/16 bit be sure to allow for that as you may not have much room for error at the bottom of the pipe. Now, having drawn the outline of your pipe on the briar and the center hole lines are clear, you proceed to the next step. This step depends on if you are using a vise to hold your briar for drilling or not. If you are using a vise you may not need this operation but please read on anyway. Using a square or at least something square like your circle template edge and bottom, draw a line perpendicular to the bowl center line but across the bottom of the bowl outside the pipe bottom line. Do the same thing to the air hole hole centerline. This is so you will be able to set the block on the drill press table and drill straight down. Sometimes there may not be enough room to make these lines. You really need them unless you have a vise to hold your work. This method permits the block to set firmly on the drill press table for drilling. With a vise, you can hold the block firmly anyway. Now you go to the saw and cut lines 1a, 2a, 3 and 4.Leave a little extra so you can finish to the line. After sawing to the lines, you will take the block to the sanding disc and finish to the line in the case of 2a to2 and 1a to 1. These lines do not have to go right to the line but may be below the lines but must be parallel.2a to 2 and 1a to 1. Lines 3 and 4 should be within an eighth or so. Now it is time to lay out the air hole and the tobacco hole. Using your compass as a hermaphrodite tool, set the distance from surface 1 to the centerline on the tobacco hole. Transfer this line to the top of the bowl surface on line 3. This gives you the center right across the top. Now do the same thing from line2 to the centerline of the air hole and transfer it to surface 4. This should give you a line across the end at the height of the air hole center. You may not be able to do this exactly as described because of the briar block. In this case, take a pencil and stack and shim it up so you can slide the block along the pencil point at the air hole centerline. Then turn the block 90 degrees and scribe across the end without moving the pencil. You can, of course, do the tobacco hole in the same manner if you need to. You get the idea. Taking your circle template, center it on the top in the position you desire the tobacco hole. The center of your template will align with the projected centerline you just made across the bowl. You will be able to move the template across the block to avoid faults and whatever to a good position. Be sure to check that the shank will also clear faults as the center of the circle you scribe on the top will also be the center of the air hole hole. Scribe the circle or top view of your bowl and mark the centerline on top in the other direction so you have a cross on top with the center of your bowl clearly marked and a circle around it where you expect the outside of the bowl to be. Using one of the methods described above transfer this centerline to the end of the block so you also have a cross on the air hole end. Now you can use your circle template to draw a circle around this cross where your stem will go. Check your work. It should look something like this. This drawing shows the top, side, and end view. The lines can be transferred using one of the methods described above. This is about all there is to layout. On a curved pipe, the same method applies but it may be a bit more difficult because of the angles. Remember to make lines 1 and 2 perpendicular to the centerlines of your air hole and your tobacco hole regardless of the angle and you will be able to drill straight down. There may not be much to be flat on the bottom, but it is better than trying to drill down while the block tips. In regard of the air hole, once you understand how I have been doing it, you will decide how you want to do it. I am sure there are other ways. Now let's get onto the drilling part.
Drilling The Block
Now you are ready to drill the block, if you are still with me. If you don't have a vise, you will need away to hold your block while drilling. I have used a pair of 1 x 2's with a couple of holes drilled in them to match the holes in your drill press. Next, with bolts of suitable length, I fastened the pair of boards to the drill press table lightly. Now I take the block of briar and set it on the table with the shank hole mark upright under the check. You should have your air hole drill mounted in the check. Lower the spindle down so the drill bit contacts the briar in the exact center of you crossed lines. Hold the briar in place with the lowered drill bit and slide one of the boards up to the side of the block. Tighten the bolts. Now check to see if the drill bit still contacts the crossed lines correctly with the block pressed against the 1 x 2. Now move the other board to "Pinch" the briar between the two boards. Tighten this board also and recheck to see that the drill bit is going to drill right at the crossed lines. Now the depth has to be set. Use a spacer or small block of wood that is the same thickness as the distance between surface 1 and the point that the tobacco hole centerline and the shank centerline meets. This should be the same as the distance between surface 1 and the bowl centerline in the case of a straight pipe but will be somewhat different in a curved pipe because surface 1 may not be parallel with the centerline of the bowl. In this case, measure to where the two centerlines cross. You might use a spacer of any material, a scale, rule, or if your drill press has a good depth gauge, use it. The idea is to set the depth of the bit at a point that will meet where the intersection of the two centerlines will meet. Check it several times because you want the hole to be just right and not too deep. Sometimes, I can just run the centerline around to the bottom of the block (surface 2) and with the block in the clamps, lower the drill bit to the line scribed on surface 2 and set the depth stop. Try it several times to be sure the stop is where you want it. Next move the briar back into position under the drill bit and while steadying the block with your hand (it is also pinched in the boards), start the drill press. It should be running at quite high speed. Something around 2000 rpm would do. Lower the drill and touch the crossed lines. Check that your mark is correct and continue drilling. You will have to repeatedly raise your drill bit to clear the chips. If it has chips stuck on the bit, tap the bit with something to vibrate them off or stop the bit and remove them before continuing. Drill down to the bottom of the stop, clear the chips and run the drill down one more time. This is a good time to also drill the mortise and square the end of the shank. If you have one of STEMCO-PIMO's tools, set it for a 5/8 mortise with the set screw. Change your speed to slow on the drill press and insert the tool. Steady the briar as before and when aligned with the air hole, press down with the press firmly. After the mortise is down, continue down to contact the squaring cutters and finish with the squaring cutter wings well into the wood. You should have a nice square, smooth end on your shank to match the stem. If it went well, give yourself a pat on the back and get ready for the tobacco hole. If you do not have the mentioned tool, use a 5/16 bit to drill a hole centered on the air hole already drilled Use your drill press stops and make the mortise 5/8 deep or perhaps a little deeper. Next use a spade bit to make a square, flat surface for the stem. You may use any size spade bit that is larger than your stem. The mortise tool mentioned above will only work on stems 5/8 inches or less in diameter. If you have a larger stem, you will have to use the spade bit method anyway. It is not as nice as the tool, but it does work. You may have to cut off the spade drill's shank a bit (maybe 1 to 11/2 inches) so you can use it and so it does not bend while drilling. Now, clear away the shavings from the drill press jig you are using and put the block back in. Move it back and forth until the bowl cross lines are under the chuck. Using a random small bit, drill a pilot hole in the exact center of the bowl crossed lines to about 3/4 the distance to the bottom of the hole. Do it by feel. Next get a larger bit and enlarge the pilot hole to about 5/16 or 3/8. Now using your bowl bit, set it with a stop like you did with the shank air hole. Set it so it will stop when you should be at near the bottom of the tobacco hole depth. Using low speed, drill the tobacco hole to the stop. If you are careful, you will feel the small break as the tobacco hole bit meets the air hole. You may be better off to stop short and lower the stop a little at a time as you feed the bit down. When you feel the air hole, stop and check your work. Proceed a bit at a time until the air hole and the bowl bottom are as you like them. You should now get another pat on the back. You have a good start on your pipe. With the pipe drilled, you no longer need surface 1 or 2. They have done their work. Now let's start on the stem.
Turning The Stem
This is a good time to turn the stem. Waiting until later will increase our danger of splitting out the shank. Now there is good wood around the mortise and that makes it easier. Select from among your collection of stems. Select one you think will be long enough to do the job and when bent or straight, will suit you. Most likely you will be using a rubber stem for your first pipe. If you have a kit, it will be fitted for you although you will have to bend it if required. We will assume you are going it from scratch. Here is where the tenon tool is such a good thing. If you do not have one, you will have to either turn it on a lathe (if you have one) or using your sanding rig, proceed to rotate the stem by hand and make the tenon round, square to the shoulder, and in line with the rest of the stem. Not easy but it can be done. The problem is that a bit too much and the tenon fits like a tatter in a sack. A little to little and the force you use to make it fit will crack the shank. If you do have to do it this way, put a bit of wax, beeswax, or paraffin on the tenon when try fitting. The wax helps smooth out the rough surface of the tenon. I say again, it can be done, but I don't recommend it. With the tool, you proceed as follows: First, using a 1/8 inch drill bit, drill the hole in the tenon to a depth of about 1 1/4 or a bit more. You can use a hand drill or the drill press. Hold the stem straight and run the bit in and out a couple of times. Next, put the tenon tool into the drill press chuck. Now if this is the first time you are using the tool, it will have to be adjusted to make the tenon the right size. You may try a different pipe stem in your stummel to see how it fits. If it is close, you may push the test tenon up on the pin of the tenon tool and adjust the setscrew to just touch the tenon. It will give you a place to start. Otherwise, adjust the setscrews until you think the cutter is a bit larger than you wish and tighten it up. Now set the speed of your drill press at about 2000 rpm. Take the dr